Equitherm Climate
The equitherm climate platform implements a weather-compensated heating controller that calculates the optimal
flow temperature based on outdoor conditions. It combines a heating curve (equitherm regulation) with optional
PID correction for precise room temperature control.
NOTE
Equitherm regulation is the standard control method used by commercial boilers and thermostats in Europe. Unlike a simple thermostat that only reacts to room temperature, equitherm proactively adjusts the heating based on outdoor weather, resulting in more stable temperatures and better efficiency.
How It Works
Section titled “How It Works”Think of equitherm like adjusting your coat based on the weather outside:
- Cold outside → Boiler sends hotter water
- Mild outside → Boiler sends cooler water
- Your job: Set the target room temperature — the curve handles the rest
What Each Setting Does
Section titled “What Each Setting Does”| Setting | Plain English | When to Adjust |
|---|---|---|
| heat_curve_coefficient (hc) | “How aggressively should heating respond to cold weather?” | Room too cold in winter → increase. Room too hot in winter → decrease. |
| heat_curve_exponent (n) | “What type of radiators do you have?” | Set once based on your system (see below). |
| heat_curve_shift (shift) | “Move the whole curve up or down” | Room too cold in mild weather → increase. Room too warm in mild weather → decrease. |
Heat Curve Coefficient (Tune This)
Section titled “Heat Curve Coefficient (Tune This)”| Building Type | Typical Range |
|---|---|
| Well-insulated modern | 1.0-1.5 |
| Average insulation | 1.5-2.0 |
| Older/less insulated | 2.0-2.5 |
Radiator Exponent (Set Once)
Section titled “Radiator Exponent (Set Once)”This accounts for how your emitters release heat:
- Underfloor heating: 1.0 (heat releases evenly)
- Modern panel radiators: 1.25 (typical default)
- Old cast iron radiators: 1.3 (heat releases more aggressively as water gets hotter)
TIP
If you don’t know your radiator type, start with 1.25. Most modern European homes use panel radiators.
The Heating Curve Formula
Section titled “The Heating Curve Formula”
Where:
| Variable | Meaning |
|---|---|
| T_flow | Calculated boiler flow temperature |
| T_target | Your target room temperature |
| T_outdoor | Outdoor temperature (from sensor) |
| hc | heat_curve_coefficient |
| n | heat_curve_exponent |
| shift | heat_curve_shift |
NOTE
When outdoor temperature exceeds your target (summer), the formula would produce invalid results.
The controller clamps output to min_flow_temp in this case.
Example Heating Curve
Section titled “Example Heating Curve”With hc = 1.2, n = 1.25, shift = 0°C, and target room temperature of 21°C:
| Outdoor Temp | Boiler Flow Temp |
|---|---|
| -10°C (very cold) | 62°C |
| 0°C (cold) | 50°C |
| +10°C (mild) | 38°C |
| +20°C (warm) | 26°C (min) |
You tune it by adjusting hc and shift based on comfort, not by calculating. The Equitherm Calculator tool can help visualize how changes affect the curve.
PID Correction
Section titled “PID Correction”The PID controller adds a correction based on the difference between actual and target room temperature, allowing the system to compensate for factors the heating curve cannot predict (solar gain, internal heat sources, etc.).
Quick Start
Section titled “Quick Start”- Copy the example below into your YAML
- Set
heat_curve_exponentbased on your radiator type (1.25 for most homes) - Set
heat_curve_coefficientto 1.0 and observe for 24 hours - Adjust
heat_curve_coefficientup if too cold, down if too warm - Only add PID if needed — most users don’t need it
Then read the Tuning Guide for details.
Basic Example
Section titled “Basic Example”climate: - platform: equitherm name: "Central Heating" outdoor_sensor: outdoor_temperature indoor_sensor: room_temperature default_target_temperature: 21°C flow_setpoint: boiler_setpoint control_parameters: heat_curve_coefficient: 1.2 heat_curve_exponent: 1.25 heat_curve_shift: 0°C output_parameters: min_flow_temp: 25°C max_flow_temp: 70°CConfiguration variables
Section titled “Configuration variables”Main Configuration
Section titled “Main Configuration”-
outdoor_sensor (Required, ID): The sensor that measures outdoor temperature. This is the primary input for the heating curve calculation.
-
indoor_sensor (Required, ID): The sensor that measures room temperature. Displays current temperature in Home Assistant. Also provides the error signal for PID correction (PID is only active when at least one of
kp,ki, orkdis non-zero). -
default_target_temperature (Required, float): The default target room temperature (setpoint) in °C. This can be changed in the frontend later.
-
flow_setpoint (Optional, ID): A number component that receives the calculated flow temperature in °C. Use this for OpenTherm integration. Exactly one of
flow_setpointorheat_outputmust be specified. -
heat_output (Optional, ID): A float output that receives a normalized value (0.0-1.0). Use this for PWM or modulating outputs. The calculated flow temperature is normalized between
min_flow_temp(→ 0.0) andmax_flow_temp(→ 1.0). Exactly one offlow_setpointorheat_outputmust be specified. -
manual_flow_temp (Optional, ID): A number component that provides a manual flow temperature override. When configured, enables a “Manual” preset in Home Assistant that bypasses the heating curve and PID entirely, sending the manual value directly to the boiler. Rate limiting is also bypassed in manual mode for direct control. Useful for testing or emergency override situations.
-
fallback_outdoor_temp (Optional, float, default:
0): Temperature in °C to use when the outdoor sensor fails or becomes stale. Choose a value appropriate for your climate (conservative for winter). The default of 0°C ensures heating continues in cold weather — in mild climates, consider 5–10°C to avoid overheating during sensor failure. -
sensor_stale_timeout (Optional, Time, default:
10min): How long to wait for sensor updates before treating the sensor as failed and switching to fallback mode. -
control_parameters (Required): Heating curve and PID parameters. See Control Parameters.
-
output_parameters (Required): Output behavior settings. See Output Parameters.
-
deadband_parameters (Optional): Deadband configuration for stable operation near target. See Deadband Parameters.
-
on_heating_start (Optional, Automation): Automation to run when the climate action transitions to
HEATING. Useful for syncing external switches or indicators. -
on_heating_stop (Optional, Automation): Automation to run when the climate action transitions from
HEATINGtoIDLEorOFF.
Heating State Automation Example
Section titled “Heating State Automation Example”climate: - platform: equitherm id: heating # ... other config ... on_heating_start: - switch.turn_on: ch_enable # Enable OpenTherm CH on_heating_stop: - switch.turn_off: ch_enable # Disable OpenTherm CHManual Flow Temperature Example
Section titled “Manual Flow Temperature Example”When manual_flow_temp is configured, a “Manual” preset appears in Home Assistant. Selecting it
bypasses the heating curve entirely and sends the manual flow temperature directly to the boiler.
number:  - platform: template    id: manual_flow_temp    name: "Manual Flow Temperature"    min_value: 25    max_value: 70    step: 1    unit_of_measurement: "°C"    optimistic: true    restore_value: true    initial_value: 40
climate: - platform: equitherm id: heating # ... other config ... manual_flow_temp: manual_flow_temp- All other options from Climate.
Control Parameters
Section titled “Control Parameters”control_parameters: heat_curve_coefficient: 1.2 heat_curve_exponent: 1.25 heat_curve_shift: 0°C kp: 0.0 ki: 0.0 kd: 0.0 derivative_averaging_samples: 8 min_integral: -1 max_integral: 1-
heat_curve_coefficient (Required, float, range: 0.5-5.0): The heat curve coefficient (hc). Higher values = more aggressive heating. See Heat Curve Coefficient for typical values.
-
heat_curve_exponent (Required, float, range: 0.5-3.0): The radiator exponent (n). See Radiator Exponent for typical values.
-
heat_curve_shift (Optional, float, default:
0): Flat offset in °C to shift the entire heating curve up or down. -
kp (Optional, float, default:
0.0): Proportional gain for PID correction. Start with small values like 0.5-2.0 if using PID. -
ki (Optional, float, default:
0.0): Integral gain for PID correction. Use very small values like 0.001-0.01. -
kd (Optional, float, default:
0.0): Derivative gain for PID correction. Often not needed for heating systems. -
derivative_averaging_samples (Optional, int, default:
1, range: 1-16): Number of samples to average for derivative term smoothing. Higher values reduce noise but add lag. Default of 1 disables smoothing. Values of 4-8 are typical when using Kd. -
min_integral (Optional, float, default:
-1): Minimum PID integral term in °C to prevent windup. -
max_integral (Optional, float, default:
1): Maximum PID integral term in °C to prevent windup.
Output Parameters
Section titled “Output Parameters”output_parameters: min_flow_temp: 25°C max_flow_temp: 70°C rate_limit_rising: 0.5 rate_limit_falling: 1.0 action_hysteresis: 0.1°C write_deadband: 0.05°C-
min_flow_temp (Required, float): Minimum flow temperature in °C to output. Protects boiler and prevents condensation.
-
max_flow_temp (Required, float): Maximum flow temperature in °C to output. Protects system and limits energy use.
-
rate_limit_rising (Optional, float, default:
0.5°C/minute): Maximum rate of flow temperature increase. Critical for preventing thermal shock in cast iron or steel boilers. Range: 0.0-2.0 °C/minute. -
rate_limit_falling (Optional, float, default:
1.0°C/minute): Maximum rate of flow temperature decrease. Usually less critical than rising limit. Range: 0.0-2.0 °C/minute. -
action_hysteresis (Optional, float, default:
0.1): Hysteresis in °C above min_flow_temp for HEATING vs IDLE action display in Home Assistant. When the calculated flow setpoint exceedsmin_flow_temp + action_hysteresis, the climate entity shows HEATING. Below this threshold, it shows IDLE. Prevents the action state from flickering during standby. -
write_deadband (Optional, float, default:
0.05): Minimum change in °C required to write new setpoint to output. Reduces boiler communication frequency.
Boiler-Specific Rate Limits
Section titled “Boiler-Specific Rate Limits”| Boiler Type | Rising | Falling | Notes |
|---|---|---|---|
| Cast iron (non-modulating) | 0.1-0.2 | 0.2-0.3 | Most sensitive to thermal shock |
| Steel firetube | 0.2-0.3 | 0.3-0.5 | Moderate sensitivity |
| Condensing (modulating) | 0.5-1.0 | 1.0-2.0 | Fast response acceptable |
| Heat pump | 1.0-2.0 | 1.0-2.0 | Limited by compressor modulation rate |
WARNING
Exceeding manufacturer recommendations for rate of temperature change can cause thermal shock, potentially cracking heat exchangers in cast iron boilers or voiding warranties.
Deadband Parameters
Section titled “Deadband Parameters”Deadband reduces PID activity when room temperature is very close to target, preventing excessive boiler cycling.
NOTE
Deadband only takes effect when PID is active (at least one of kp, ki, kd > 0). With pure equitherm
control (all PID gains at 0), this section can be omitted.
deadband_parameters: threshold_high: 0.3°C threshold_low: -0.3°C kp_multiplier: 0.0 ki_multiplier: 0.05 kd_multiplier: 0.0- threshold_high (Required, float): Upper threshold in °C relative to target.
- threshold_low (Required, float): Lower threshold in °C relative to target.
- kp_multiplier (Optional, float, default:
0.0): Multiplier for Kp inside deadband. - ki_multiplier (Optional, float, default:
0.0): Multiplier for Ki inside deadband. - kd_multiplier (Optional, float, default:
0.0): Multiplier for Kd inside deadband.
Deadband Setup
Section titled “Deadband Setup”A deadband prevents the PID controller from constantly adjusting the flow setpoint once the room temperature has settled within a range of the target. This reduces boiler communication and prevents wear from excessive cycling.
To understand the benefit, consider a system constantly adjusting the flow temperature as the room sensor records minor changes from +0.1°C to -0.1°C. This causes unnecessary boiler communication. With a deadband in place, the PID controller will limit output variations within this zone.
The most basic setup specifies the threshold around the target temperature:
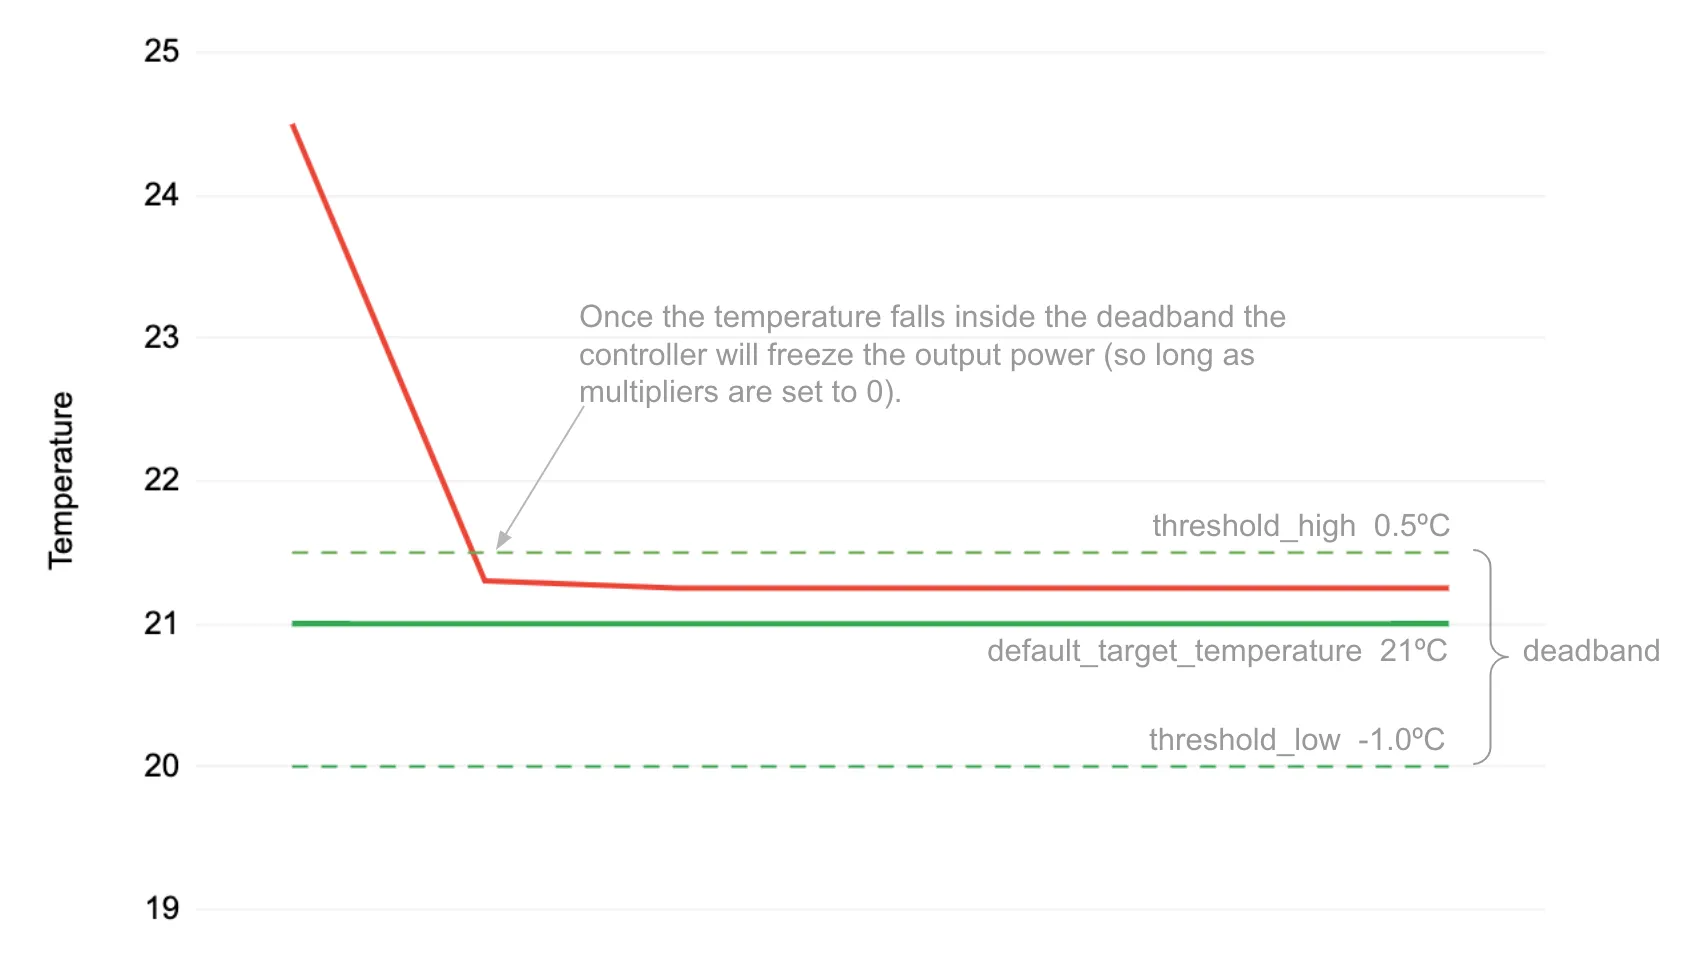
default_target_temperature: 21°C...deadband_parameters: threshold_high: 0.5°C threshold_low: -0.5°CIn this example the deadband is between 20.5°C - 21.5°C. How the PID controller behaves inside this deadband
depends on the multipliers.
Deadband Multipliers
Section titled “Deadband Multipliers”Deadband multipliers tell the controller how to operate when inside the deadband.
Each of the P, I, and D terms can be controlled using the kp, ki, and kd multipliers. For instance, if
ki_multiplier is set to 0.05 then the integral term will be set to 5% of its normal value within the deadband.
If all multipliers are set to 0, the controller will not adjust output at all within the deadband. This is the default.
Most deadband implementations set kp_multiplier and ki_multiplier to a small gain like 0.05 and set
derivative to 0. This means the PID output will calmly make minor adjustments over a 20x longer timeframe
to stay within the deadband zone.
To start with we recommend just setting ki_multiplier to 0.05 (5%). Then set kp_multiplier to 0.05
if the controller is falling out of the deadband too often.
deadband_parameters: threshold_high: 0.5°C threshold_low: -0.5°C kp_multiplier: 0.0 # proportional gain turned off inside deadband ki_multiplier: 0.05 # integral accumulates at only 5% of normal ki kd_multiplier: 0.0 # derivative is turned off inside deadband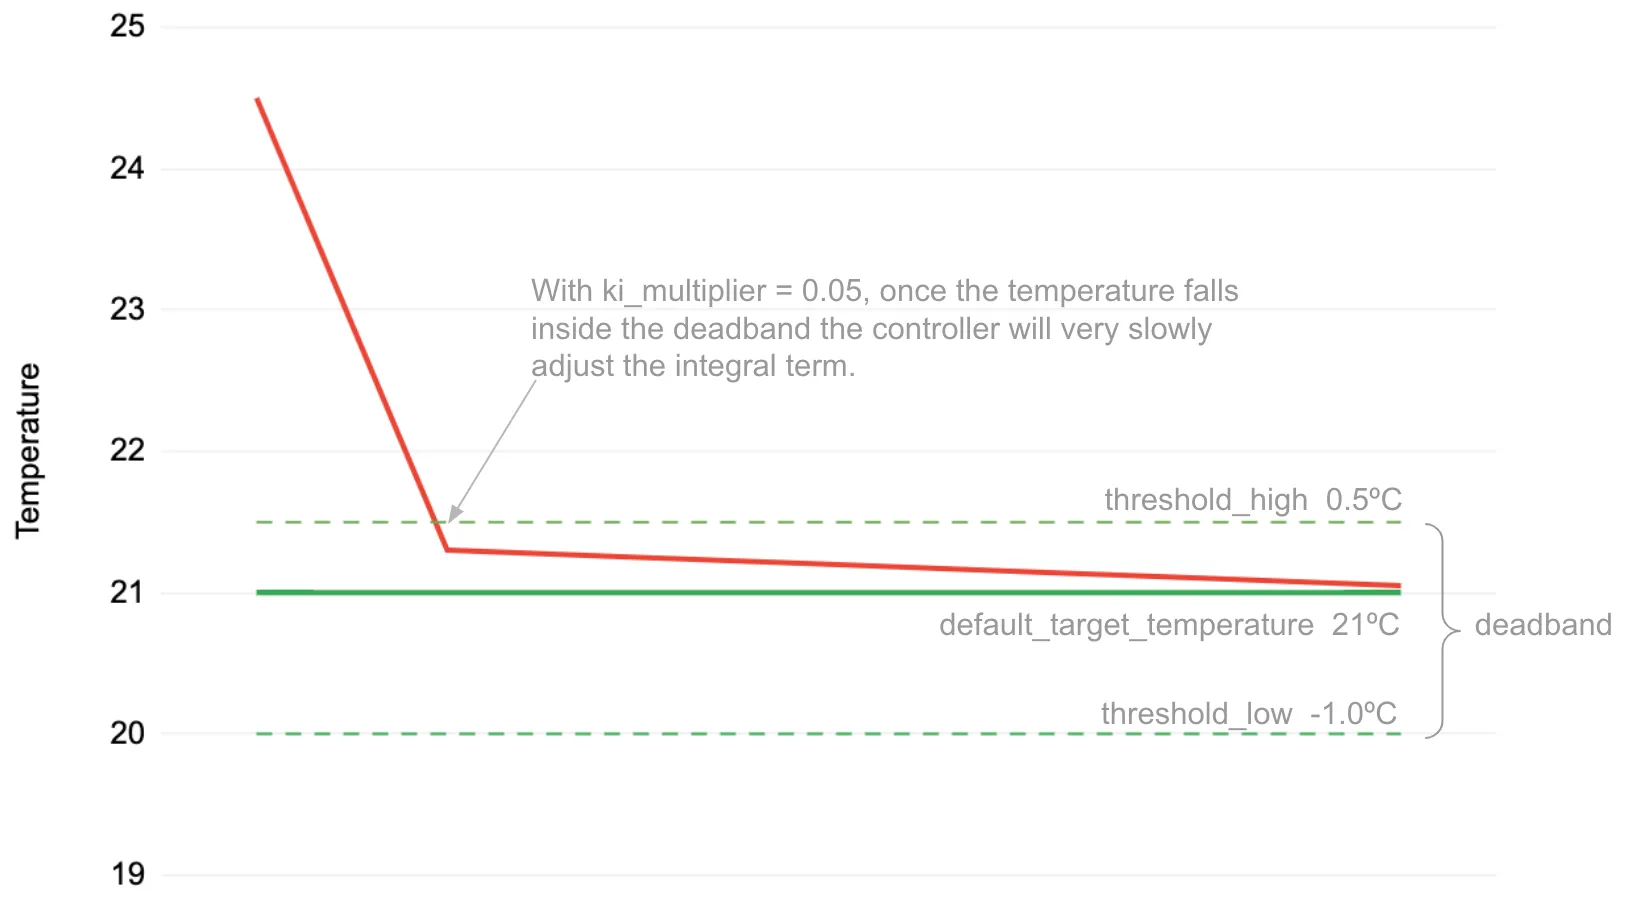
Complete Example with OpenTherm
Section titled “Complete Example with OpenTherm”This example shows a production configuration using the DIYLESS Master OpenTherm Shield stacked on an ESP32 Wemos D1 Mini.
# Weather-compensated heating with DIYLESS Master OpenTherm Shield# Tested with ESPHome 2026.3.0+
esp32:  board: wemos_d1_mini32  framework:    type: esp-idf
opentherm:  in_pin: GPIO21  out_pin: GPIO22
# OpenTherm switches for boiler controlswitch:  - platform: opentherm    ch_enable:      id: ch_enable      internal: true                    # Hidden from UI (controlled by climate)    dhw_enable:      id: dhw_enable      name: "Hot Water"
# Flow setpoint number for OpenThermnumber:  - platform: opentherm    t_set:      id: ch_setpoint      name: "Boiler Control Setpoint"      min_value: 25.0      max_value: 70.0      step: 0.1
# Temperature sensors from Home Assistantsensor:  - platform: homeassistant    id: outdoor_temperature    entity_id: sensor.outdoor_temperature    filters:      - filter_out: nan      - exponential_moving_average:          alpha: 0.3          send_every: 1      - throttle: 60s
  - platform: homeassistant    id: room_temperature    entity_id: sensor.coldest_room_temperature    filters:      - filter_out: nan      - throttle: 60s
# Main climate controllerclimate:  - platform: equitherm    name: "Central Heating"    id: heating    outdoor_sensor: outdoor_temperature    indoor_sensor: room_temperature    default_target_temperature: 21°C    flow_setpoint: ch_setpoint    sensor_stale_timeout: 10min    on_heating_start:      - switch.turn_on: ch_enable    on_heating_stop:      - switch.turn_off: ch_enable    control_parameters:      heat_curve_coefficient: 2.0      # Higher value for older building      heat_curve_exponent: 1.25        # Panel radiators      heat_curve_shift: 0°C      kp: 0.5                          # Gentle proportional correction      ki: 0.0                          # No integral (curve handles offset)      kd: 0.0    output_parameters:      min_flow_temp: 25°C      max_flow_temp: 70°C    deadband_parameters:      threshold_high: 0.3°C            # Narrow deadband      threshold_low: -0.3°C      kp_multiplier: 0.1               # 10% Kp inside deadband      ki_multiplier: 0.0      kd_multiplier: 0.0
NOTE
The ch_enable switch is marked internal: true because it’s controlled automatically by the
climate controller’s on_heating_start and on_heating_stop automations. The dhw_enable switch
is exposed to the UI for manual control of domestic hot water.
Runtime Tuning with Numbers
Section titled “Runtime Tuning with Numbers”For runtime adjustment of heating parameters, use the equitherm.number platform:
number: - platform: equitherm climate_id: heating heat_curve_coefficient: name: "Heat Curve Coefficient" heat_curve_exponent: name: "Heat Curve Exponent" heat_curve_shift: name: "Heat Curve Shift" pid_proportional_gain: name: "PID Kp" pid_integral_gain: name: "PID Ki" pid_derivative_gain: name: "PID Kd" fallback_outdoor_temp: name: "Fallback Outdoor Temp" rate_limit_rising: name: "Rate Limit Rising" rate_limit_falling: name: "Rate Limit Falling"Configuration variables:
-
climate_id (Required, ID): ID of the equitherm climate component. If only one equitherm climate is configured, this is automatically resolved.
-
heat_curve_coefficient (Optional): Runtime-adjustable heat curve coefficient (0.5-5.0, step 0.05).
-
heat_curve_exponent (Optional): Runtime-adjustable radiator exponent (0.5-3.0, step 0.05).
-
heat_curve_shift (Optional): Runtime-adjustable curve shift (-20°C to +20°C, step 0.5°C).
-
pid_proportional_gain (Optional): Runtime-adjustable Kp (0-20, step 0.01).
-
pid_integral_gain (Optional): Runtime-adjustable Ki (0-10, step 0.0001).
-
pid_derivative_gain (Optional): Runtime-adjustable Kd (0-10, step 0.01).
-
fallback_outdoor_temp (Optional): Runtime-adjustable fallback temperature (-40°C to +30°C).
-
rate_limit_rising (Optional): Runtime-adjustable rising rate limit (0-2°C/min).
-
rate_limit_falling (Optional): Runtime-adjustable falling rate limit (0-2°C/min).
All numbers support these additional options:
- mode (Optional, string, default:
AUTO): UI mode for Home Assistant. One ofAUTO,BOX, orSLIDER. - min_value (Optional, float): Override default minimum.
- max_value (Optional, float): Override default maximum.
- step (Optional, float): Override default step size.
- restore_value (Optional, boolean, default:
true): Restore value on reboot.
Diagnostic Sensors
Section titled “Diagnostic Sensors”Sensor Platform
Section titled “Sensor Platform”sensor: - platform: equitherm climate_id: heating type: HEATING_CURVE_OUTPUT name: "Heating Curve Output" - platform: equitherm climate_id: heating type: PID_ADJUSTED_OUTPUT name: "PID Adjusted Output" - platform: equitherm climate_id: heating type: FLOW_SETPOINT name: "Flow Setpoint" - platform: equitherm climate_id: heating type: ACTIVE_SETPOINT name: "Active Setpoint" - platform: equitherm climate_id: heating type: PID_CORRECTION name: "PID Correction" - platform: equitherm climate_id: heating type: PID_PROPORTIONAL name: "PID Proportional" - platform: equitherm climate_id: heating type: PID_INTEGRAL name: "PID Integral" - platform: equitherm climate_id: heating type: PID_DERIVATIVE name: "PID Derivative" - platform: equitherm climate_id: heating type: FALLBACK_DURATION name: "Fallback Duration"Configuration variables:
-
climate_id (Required, ID): ID of the equitherm climate component. If only one equitherm climate is configured, this is automatically resolved.
-
type (Required, string): The value to monitor. Processing pipeline:
HEATING_CURVE_OUTPUT→ Pure heating curve calculation (before PID and rate limiting).PID_ADJUSTED_OUTPUT→ Curve + PID correction applied (before rate limiting).FLOW_SETPOINT→ After rate limiting (value ready to write).ACTIVE_SETPOINT→ Last value actually sent to the boiler.PID_CORRECTION→ Current PID correction being applied.PID_PROPORTIONAL→ PID proportional term.PID_INTEGRAL→ PID integral term.PID_DERIVATIVE→ PID derivative term.FALLBACK_DURATION→ How long the system has been in fallback mode (seconds).
Binary Sensor Platform
Section titled “Binary Sensor Platform”binary_sensor: - platform: equitherm climate_id: heating outdoor_sensor_fault: name: "Outdoor Sensor Fault" indoor_sensor_fault: name: "Indoor Sensor Fault" rate_limiting_active: name: "Rate Limiting Active"Configuration variables:
-
climate_id (Required, ID): ID of the equitherm climate component. If only one equitherm climate is configured, this is automatically resolved.
-
outdoor_sensor_fault (Optional):
ONwhen outdoor sensor has failed and fallback temperature is being used. -
indoor_sensor_fault (Optional):
ONwhen indoor sensor has failed (PID disabled, pure equitherm mode). -
rate_limiting_active (Optional):
ONwhen output is being limited by rate limiting.
Text Sensor Platform
Section titled “Text Sensor Platform”text_sensor: - platform: equitherm climate_id: heating control_mode: name: "Control Mode"Configuration variables:
-
climate_id (Required, ID): ID of the equitherm climate component. If only one equitherm climate is configured, this is automatically resolved.
-
control_mode (Optional): Text sensor showing current control mode:
Normal- Both sensors working, full equitherm + PID controlOutdoor Fallback- Outdoor sensor failed, using fallback temperatureIndoor Fallback- Indoor sensor failed, PID disabled (pure equitherm)Full Fallback- Both sensors failed
Actions
Section titled “Actions”climate.equitherm.force_recalculate Action
Section titled “climate.equitherm.force_recalculate Action”Force an immediate recalculation of the flow setpoint, bypassing rate limiting. Useful after changing parameters via number components or for testing.
# Simple form - recalculate with PID updateon_...:  - climate.equitherm.force_recalculate: heating
# Full form - with optionson_...:  - climate.equitherm.force_recalculate:      id: heating      update_pid: false    # Skip PID calculation, only recalculate curve
Exposing via Home Assistant API
Section titled “Exposing via Home Assistant API”You can expose this action to Home Assistant for manual triggering:
api:  actions:    - action: force_recalculate      then:        - climate.equitherm.force_recalculate:            id: heating            update_pid: true
    - action: force_recalculate_no_pid      then:        - climate.equitherm.force_recalculate:            id: heating            update_pid: false
Configuration variables:
- id (Required, ID): ID of the equitherm climate component.
- update_pid (Optional, boolean, default:
true): Whether to update the PID calculation.
Sensor Failure Handling
Section titled “Sensor Failure Handling”The component handles sensor failures gracefully:
-
Outdoor sensor fails: Uses
fallback_outdoor_tempto continue heating. The system logs a warning and theoutdoor_sensor_faultbinary sensor turns on. -
Indoor sensor fails: Switches to pure equitherm mode (PID disabled). The heating curve alone determines flow temperature. The
indoor_sensor_faultbinary sensor turns on. -
Both sensors fail: Uses fallback outdoor temp and disables PID. Maximum fallback mode.
-
Sensor recovers: Automatically returns to normal operation and resets rate limiting state.
Tuning Guide
Section titled “Tuning Guide”Step 1: Disable PID
Section titled “Step 1: Disable PID”Start with all PID gains at 0 to tune the heating curve first:
control_parameters: heat_curve_coefficient: 1.0 heat_curve_exponent: 1.25 kp: 0.0 ki: 0.0 kd: 0.0Step 2: Tune the Heating Curve
Section titled “Step 2: Tune the Heating Curve”Monitor room temperature over several days. Adjust:
- Room too cold in cold weather: Increase
heat_curve_coefficient - Room too warm in cold weather: Decrease
heat_curve_coefficient - Room too cold in mild weather: Increase
heat_curve_shift - Room too warm in mild weather: Decrease
heat_curve_shift
Step 3: Add PID Correction (Optional)
Section titled “Step 3: Add PID Correction (Optional)”If the heating curve alone cannot maintain stable temperature:
- Start with small
kp(0.5-1.5) - Add tiny
ki(0.001-0.01) if there’s persistent offset kdis rarely needed for heating systems
Companion Tools
Section titled “Companion Tools”Equitherm Calculator is a web-based companion tool for visualizing and tuning your heating parameters:
- Real-time curve visualization - See how changes to hc, n, and shift affect flow temperatures
- PID simulation - Test PID parameters with deadband support before deploying
- Preset management - Save and load parameter configurations
- YAML generator - Generate ESPHome configuration from your tuned parameters
- URL sharing - Share configurations via URL parameters
The tool uses the same calculation logic as the ESPHome component, so what you see in the visualization matches what your heating system will do.
See Also
Section titled “See Also”- OpenTherm Component
- PID Climate
- Climate Component
- Equitherm Calculator - Visualization and tuning tool
- DIYLESS Master OpenTherm Shield - OpenTherm shield for ESP8266/ESP32
- API Reference: equitherm.h